Here, we created magical crochet patterns to create a fairy doll with delicate wings and a pretty dress for enchanting, handmade charm. If you're looking for something magical to bring your crochet hooks to life, we have just the thing for you. Our collection features a range of fun and enchanting Fairy Doll Amigurumi patterns that are perfect for adding a touch of whimsy to your crochet projects.

Whether you're a seasoned crocheter or just starand dive into a worting, these patterns will guide you through creating your adorable fairy dolls, complete with colorful outfits and charming details. So, grab your crochet gear ld where yarn and imagination come together to create something truly special!
Fairy Doll Crochet Pattern
These Fairy Doll Crochet Patterns will guide you to create enchanting amigurumi dolls with delicate features, including wings, a whimsical dress, and possibly a magic wand or floral crown. Typically made from soft, colorful yarn, this fairy doll captures the imagination with its detailed attire and gentle expression. It's perfect for gifting, playing, or as a decorative piece for those who adore the mystical world of fairies.
Cat Fairy Girl Amigurumi
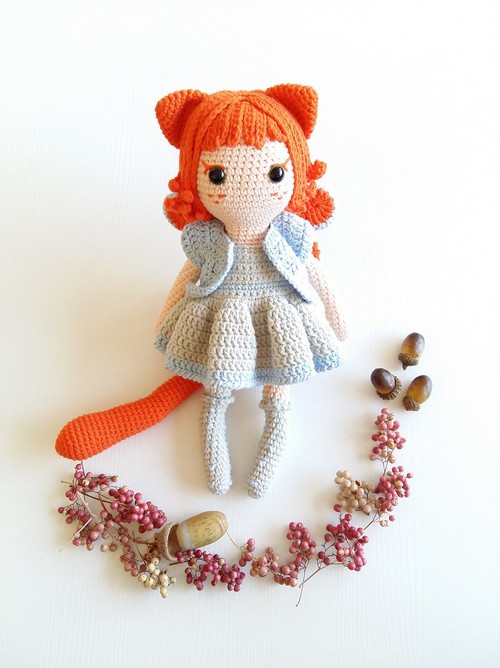
Making your own Fun Crochet Cat Fairy Girl Amigurumi is delightful and straightforward! Begin with the legs, using grey yarn, and work your way up to the body in skin-color yarn, attaching the legs with a simple chain. Once the body is formed, you can stuff it and then crochet the head directly onto the body. The arms and head will need safety eyes and a bit of stuffing before being sewn on. Add a whimsical touch with a colorful hair cap and tresses in orange yarn and the tiny dress in alternating bands of grey and blue, topped with ruffles.
Little Fairy Pui
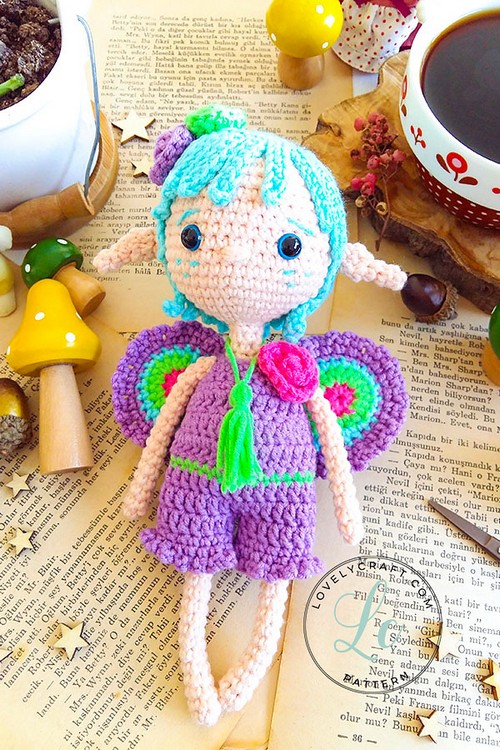
Creating your enchanting Little Fairy Pui Amigurumi starts with shaping the legs and body using skin-colored yarn. As you progress, switch to creating the head, and remember to implant safety eyes for a realistic touch. Stuff the body with fiberfill gradually, and craft arms in the same skin-colored yarn. Next, crochet a lovely blue hair cap and strands of hair.
Embellish your fairy with a romper using purple and green yarn, then attach exquisitely crafted tri-colored fairy wings to the romper's back. Finish this magical creation by adding a delicate green yarn necklace and decorate it with three charming DCinc-styled flowers - two by each ear and one on the shoulder. This pattern requires basic crochet skills and creativity to bring this adorable fairy to life.
Some Pro Tips For Making Little Fairy Amigurumi Are
- Choose the Right Tools: Using high-quality crochet hooks that fit comfortably in your hand can make a big difference in your project. A hook that's too small can make your work tight and difficult to do, while one that's too large can result in a looser, less precise crochet.
- Yarn Choice: Think about the texture and weight of your yarn. Cotton yarns might work best because they're sturdy, easy to work with, and keep their shape well after stuffing.
- Practice the Magic Circle: Many Amigurumi projects begin with a magic circle. If you're unfamiliar with this technique, spend time practicing. This skill is a must for creating tight, well-shaped bodies and heads in Amigurumi.
- Stuffing: When it comes to stuffing, less is more. Over-stuffing can distort your Amigurumi, but under-stuffing can make it floppy. You're looking for a happy medium to keep your fairy doll well-shaped yet soft and cuddly.
- Stitch Consistency: Consistent stitches result in neat Amigurumi. Take care to make your stitches even, especially when working in the round.
- Safety Eyes: Safety eyes can give your Amigurumi a professional finish. If these aren't available, small pieces of carefully embroidered black yarn or painted wooden beads can be used.
- Finishing Touches: Don't forget the detailing. The fun part of Amigurumi is creating a character. Small touches, like added flowers or a crocheted necklace, can make a big difference.


Leave a Reply