
The Crochet Quicksilver Amigurumi Pattern is perfect for Marvel fans. It's a step-by-step guide to creating a mini-version of Quicksilver with yarn, hook, and a little creativity!
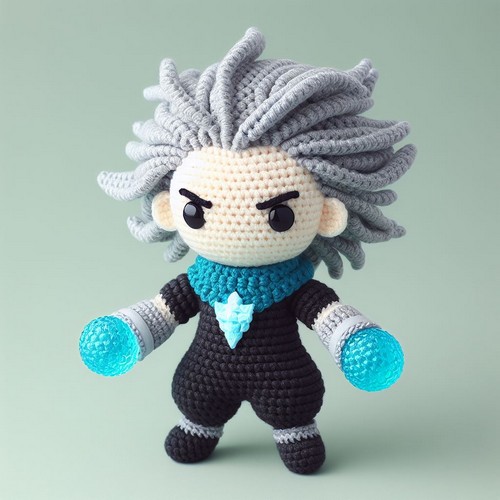
The Crochet Quicksilver Amigurumi pattern creates a charming, cuddly toy that's a delight to make and hold. Fashioned as a sweet cartoonish animal, the pattern involves a unique blend of intricate stitches and techniques, like the magic ring, single crochet, and increase/decrease. Complemented by simplistic body shaping, this pattern yields a beautiful three-dimensional plushie, perfect for gifting or decorating.
Step-by-step Guide
1. Gather Your Materials:
- Crochet hook: The size will depend on the pattern's recommendations and your yarn choice. A 2.5mm hook is often used for amigurumi.
- Yarn: Choose colors that match Quicksilver's signature look (e.g., silver, gray, blue). Sport weight yarn is common for amigurumi.
- Pattern: Obtain the specific Quicksilver Amigurumi pattern you'll be following.
- Other supplies:
- Scissors
- Yarn needle
- Stitch markers (optional)
- Safety eyes or buttons (optional)
- Stuffing material (polyester fiberfill is popular)
2. Crochet the Body:
- Start with a magic ring and work in rounds, following the pattern's instructions for increasing and decreasing stitches to shape the body.
- Pay close attention to color changes if needed to create Quicksilver's costume details.
3. Crochet the Head:
- Work in rounds, similar to the body, to create a spherical shape.
- Attach safety eyes or embroider eyes as directed in the pattern.
4. Crochet the Limbs:
- Make the arms and legs separately, usually starting with long tubes and shaping the hands and feet as needed.
5. Assemble the Parts:
- Stuff the body, head, and limbs firmly.
- Sew the limbs securely to the body.
- Attach any additional details like hair, clothing elements, or accessories as instructed in the pattern.
6. Finishing Touches:
- Weave in any loose ends of yarn.
- Embroider facial features or other details as desired.
Key Considerations:
- Pattern Specificity: Always refer to your chosen pattern for precise stitch counts, techniques, and assembly instructions.
- Amigurumi Skills: If you're new to amigurumi, consider practicing basic stitches and techniques before starting this project.
- Customization: Feel free to personalize your Quicksilver Amigurumi with unique details or color variations!


Leave a Reply