
Remember those carefree summer days of your childhood when jumping into a cool pool was the highlight of your day? The Crochet Pool Floaty Ring Duck brings a piece of those cherished memories right back to you but with a special twist. This crochet amigurumi toy, modelled after a playful duck sitting on a floaty ring, is not just a toy; it's a tangible piece of nostalgia. It captures the joy and innocence of those long, sun-filled days. Whether you're an avid crochet enthusiast or someone looking to hold onto a piece of their past, this crocheted duck serves as a heartwarming, handcrafted bridge to those simpler times.
Crochet Pool Floaty Ring Duck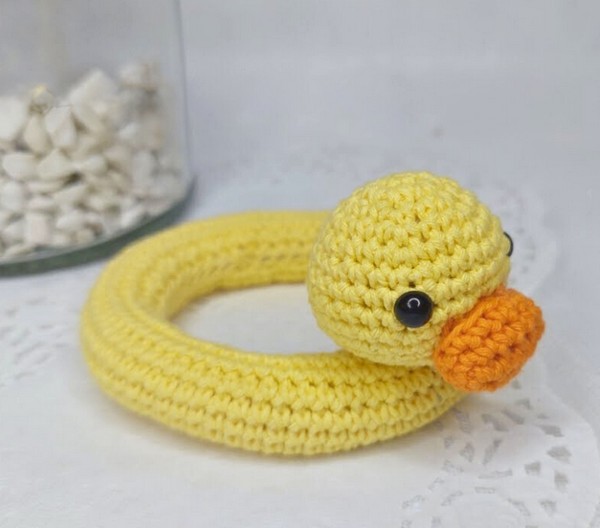
Perfect for crocheters of any skill level, this pattern is a breeze to follow and allows endless customization. Choose from a spectrum of colours to create a charming floaty duck in any size or shape you like. Whether you use bright yellows for a classic look or mix it up with vibrant patterns, your finished floaty friend will brighten any space. Plus, these adorable ducks make perfect gifts or playful decor, floating beautifully as whimsical additions to pools, baths, or ponds. Explore the joy of creating something uniquely yours with this versatile and fun pattern!
Crochet Pool Floaty Ring Duck
The Crochet Pool Floaty Ring Duck amigurumi can serve multiple purposes, making it not only a fun item to have but also versatile. Here are some of its uses, detailed in bullet points:
- Cherished Keepsake: It's a beautiful way to preserve and cherish those golden memories of childhood, serving as a keepsake that can be displayed in your home.
- Delightful Décor: This amigurumi can be a charming addition to any room's décor, especially suited for a children's room or a space with a whimsical, playful theme.
- Unique Gift: It makes for a thoughtful and unique gift for friends or family who appreciate crochet art, nostalgia, or have a fondness for ducks and water-related items.
- Stress Reliever: It's a perfect size for a desk or office, providing a cute distraction or a stress-relieving object to hold and squeeze during a break.

- Educational Toy: For children, the Crochet Pool Floaty Ring Duck can be an educational tool, encouraging imaginative play and helping young ones develop fine motor skills.
- Photography Prop: It can act as an adorable prop for themed photoshoots, especially for babies' milestone pictures or summer-themed sessions.
- Craft Inspiration: It could serve as inspiration for craft enthusiasts and crochet hobbyists, perhaps sparking ideas for their own projects or starting a collection.
- Travel Buddy: Compact and lightweight, the crochet duck can be taken on trips and outings, offering a familiar comfort object for children or a cute travel mascot for adults.
By having such a cute and versatile item like the Crochet Pool Floaty Ring Duck, you can add a bit of joy and utility in a creative and handcrafted form.


Leave a Reply