
Let's bring a super cute smiling and slingy Pokemon character, Ditto, to life by following this easier step-by-step pattern we gathered. It consists of fun and admirable appearances, a smiling crochet character that brings a touch of style and is a cuddly playing companion for kids all day.
Crochet Ditto Pattern Free
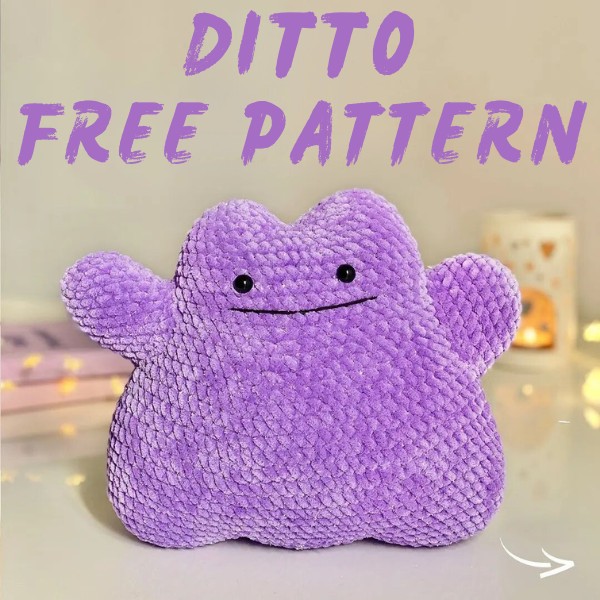
You can make ditto in the color presented in the picture above or go with the favorite tone you desire and add a touch of customized beauty and style to your crochet amigurumi collection in no time. Follow the guidelines we provided and surely thank me later with the snap of a cute pokemon characters made by you.
Materials:
- Colour A (2 balls):
- Cygnet Jellybaby Glitter Chenille Chunky - French Violet
- Colour B: Rico Ricorumi DK - Black
- Crochet Hook: 4mm
- Safety eyes: 10mm
- Toy stuffing
DITTO:
Small circle:
- 1. Using color A, work 6 sc in the magic ring (6)
- 2. Inc in each st (12)
- 3. [1 sc, 1 inc] x6 (18)
- 4. [2 sc, 1 inc] x6 (24)
- 5. [3 sc, 1 inc] x6 (30)
- 6. Sc in each st. Fasten off.
Large circle (make 2):
- 1. Using color A, work 6 sc in the magic ring (6)
- 2. Inc in each st (12)
- 3. [1 sc, 1 inc] x6 (18)
- 4. [2 sc, 1 inc] x6 (24)
- 5. [3 sc, 1 inc] x6 (30)
- 6. [4 sc, 1 inc] x6 (36)
- 7. Sc in each st
Fasten off on your first circle; on your second, DO NOT fasten off. You'll now attach the circles in a row; see next page.
DITTO (continued):

With your hook still attached to one of the large circles:
- crochet 11 sts around the smaller circle, starting in the stitch after where you fastened off
- now crochet 32 sts around the second large circle
- then, 11 sts around the smaller circle, starting in the 5th st from your last st in the small circle so that you have 4 unworked sts on the inside of the body
- now crochet 32 sts on the first large circle, starting in the 5th st from the start of the circle so that you have 4 unworked sts on the inside of the body (86)
- Using a tail of color A or cotton yarn, stitch across the unworked sts to close, 32 sts
- x = unworked sts
- XXXX
- XXXX
- 11 sts
- XXXX
- XXXX
DITTO (continued):
We'll refer to this starting point as row 2 for ease, row 1 being where you joined three circles.
- 1. Start 32 sts
- 2-9. Sc in each st
- 10. [12 sc, 1 inv.dec] x6, 1 inv.dec (79)
- 11. [11 sc, 1 inv.dec] x6, sc 1 (73)
- 12. Sc in each st
- 13.9 sc, 2 inv.dec, [10 sc, 1 inv.dec] x5 (66)
- 14. [9 sc, 1 inv.dec] x6 (60)
- 15. [8 sc, 1 inv.dec] x6 (54)
- 16-17. Sc in each st
- 18. [7 sc, 1 inv.dec] x6 (48)
- 19-23. Sc in each st
- 24. [6 sc, 1 inv.dec] x6 (42)
- 25. Sc in each st
Insert the safety eyes between rows 20-21 (remember to count from the correct row as per the note on rows above) with 6 sts in between on row 20.
DITTO (continued):

You'll now make the top bumps
Small bump:
- 26. Sc 8, now count 12 sts backward from your starting st, crochet across into the 12th st to create a new circle, sc in all 12 sts (20)
- 27. [3 sc, 1 inv.dec] x4 (16)
- 28. [2 sc, 1 inv.dec] x4 (12)
- 29. [1 sc, 1 inv.dec] x4 (8)
Sew the last sts together and tie in loose ends. Before starting the next part, stuff the Ditto firmly and top up as you go.
- 12 sts
- Start 8 sts
- Start 22 sts
DITTO (continued):
- Larger bump: 26. Starting the 9th unworked st from the small bump, sc 22 (22)
- 27. Join in your first st of row 26, [3 sc, 1 inv.dec] x4, 1 inv.dec (17)
- 28. [2 sc, 1 inv.dec] x4, sc 1 (13)
- 29. [1 sc, 1 inv.dec] x4, sc 1 (9)
Top up the stuffing stitch the last sts together, and tie in loose ends.
Arms:
Arm 1:
- 1. Using color A, work 6 sc in the magic ring (6)
- 2. Inc in each st (12)
- 3. [1 sc, 1 inc] x6 (18)
- 4. [2 sc, 1 inc] x6 (24)
- 5-9. Sc in each st
Fasten off, leaving a tail for attaching later. Arm 2:
- 1. Using color A, work 6 sc in the magic ring (6)
- 2. Inc in each st (12)
- 3. [1 sc, 1 inc] x6 (18) 4-10. Sc in each st
- Fasten off, leaving a tail for attaching later.
Assembly:
- Arm 1: Stuff the arm and attach across rows 10-19.
- Arm 2: Stuff the arm and attach across rows 12-19.
- Mouth: Using colour B, stitch the mouth on in between rows 18-19, 11 sts wide.

Free crochet pattern by @catknit

Leave a Reply