
Are you a fan of teddy bears and rattles? Then this is your lucky day. We have an easy and fun project for you. We're talking about the Crochet Bear Rattle Pattern. It's a chance to add something super cute to your crochet collection. It's soft, lovable, and makes a nice rattle sound, resulting in a great plaything for your kids. Not to mention, it has a cool, kind of spooky look, which makes it even more interesting. Don't worry; we're not leaving you to figure it out alone. We will guide you every step of the way through our easy-to-follow crochet pattern.
Easy Crochet Bear Rattle Pattern
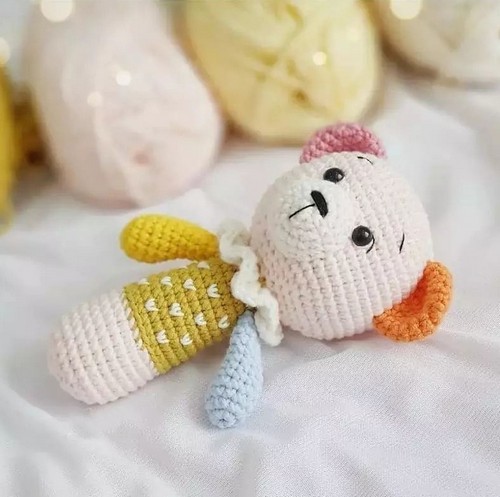
Designer: Maiacraft On Instagram
Abbreviation
- MR: Magic ring
- R: Round
- Sc: Single crochet
- Ch: Chain
- BLO: Back loop only
- Inc, dec: Increase, decrease
- Sts: Stitches
- Dc: Double crochet
Materials
- Milk cotton yarn (light pink, blue, yellow, green, pink, white, orange)
- Crochet hook 3.0mm
- Yarn needles
- Fiberfill
- Black eyes
- Pins
Head & Handle
- R1: Light pink. MR 6sc (6)
- R2: 6 inc (12)
- R3: (sc, inc) x6 (18)
- R4: (2sc, inc) x6 (24)
- R5: (3sc, inc) x6 (30)
- R6: (4sc, inc) x6 (36)
- R7: (5sc, inc) x6 (42)
- R8: ( 6sc, inc) x6 (48)
- R9 -R18: 48sc ( (48)
- R19: ( 6sc, dec) x6 (42)
- R20: (5sc, dec) x6 (36) R
- 21: (4sc, dec) x6 (30)
- R22: (3sc, dec) x6 (24)
- R23: (2sc, dec) x6 (18)
- R24: Green 18sc (18)
- R25: BLO 18sc (18)
- R26: 18sc (18)
- R27: (5sc, inc) x3 (21)
- R28 - R31:21sc (21)
- R32: (6sc, inc) x3 (24)
- R33 R36: 24sc (24)
- R37: Light pink. BLO (7sc, inc) x3 (27)
- R38 R41: 27sc (27)
- R42: (8sc, inc) x3 (30)
- R43: 30sc (30)
- R44: (3sc, dec) x6 (24)
- R45: (2sc, dec) x6 (18)
- R46: (sc, dec) x6 (12)
- R47: 6dec (6)
Ears
Pink + Orange
- R1: MR 6sc (6)
- R2: 6inc (12)
- R3: (sc, inc) x6 (18)
- R4 - R6: 18sc (18)
Arms
Yellow + Blue
- R1: MR 6sc (6)
- R2: 6 inc (12)
- R3-R4: 12sc (12)
- R5: dec, 10sc (11)
- R6: dec, 9sc (10)
- R7: dec, 8sc (9)
- R8 : R10: 9sc (9)
- R11: (sc, dec) x3 (6)
- FO & leave a long tail for sewing
Nose
White
- R1: MR 6sc (6)
- R2: 6inc (12)
- R3: (sc, inc) x6 (18)
- R4 R5: 18sc (18)
Collar
Use white yarn. FLO of R25. Ch3 (counts as the first dc of the row), 2dc in the same st, 3dc in each st after, join with a slst in the third chain up (ch3 at the beginning of the round) to close round. Use the cream yarn and embroider the detail on the handle.
Some important tips for making your crochet bear rattle pattern:
- Choose the Right Yarn: Soft, baby-friendly yarn is essential for a cuddly feel. Cotton or acrylic yarns are good choices as they are durable and easy to clean.
- Safe Stuffing Material: Use a safe, non-toxic stuffing material. Make sure it's evenly distributed for a nice shape, but don't overstuff it, as it may stretch the stitches.
- Tight Stitches: Keep your stitches tight to ensure the stuffing doesn't come out, especially because this toy is for small children who might put it in their mouths.
- Secure the Rattle Insert: If inserting a rattle, ensure it is securely encased within the toy. A small plastic capsule from a kinder egg or a commercial rattle insert is a good choice. Ensure it's wrapped in stuffing to prevent it from moving too much.
- Embroider with Care: If your pattern has embroidered features like eyes or a nose, ensure these are securely attached. Alternatively, consider using safety or embroidered eyes to avoid choking hazards.
- Follow the Pattern Carefully: Following the pattern step by step is crucial for the finished product to look just right, especially with amigurumi patterns. Pay close attention to increase and decrease instructions.

Leave a Reply