
Turtles are fascinating creatures that have roamed the earth for millions of years. These gentle animals move slowly on land but are surprisingly swift in water. They carry their homes on their backs, a unique shell that protects them from predators. Among the various charming creations inspired by these creatures, the crochet baby turtle stands out as a beloved project for many. These handcrafted turtles bring a touch of nature into our homes, serving as adorable reminders of the slow but steady pace at which every moment in life should be cherished. Whether as a gift for a newborn or a decorative piece, each crochet baby turtle carries a story of perseverance and beauty.
Crochet Baby Turtle Amigurumi
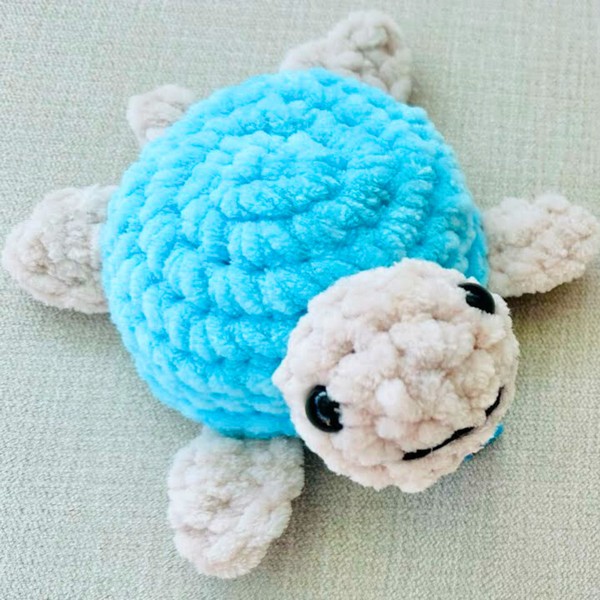
Crochet Baby Turtle Amigurumi
The fluffy and soft crochet turtle amigurumi pattern has a variety of adorable and practical uses. Here are some of the wonderful ways you can enjoy these handcrafted turtles:
- Children's Toy: With its soft and cuddly nature, the crochet turtle makes for a perfect toy for children, providing them not only with a plaything but also with a comforting companion during naptime.
- Nursery Decoration: Its cute appearance makes it an excellent decorative addition to a baby's nursery or a child’s bedroom, adding a warm and personal touch to the space.
- Educational Tool: Educators and parents can use these crochet turtles as engaging tools to teach children about marine life, the importance of wildlife preservation, and the concept of taking it slow and steady in life, just like the turtle does.
- Gifts: A handmade turtle amigurumi is a thoughtful and unique gift for baby showers, birthdays, or as a special souvenir for turtle lovers of any age.
- Stress Relief: For adults, the soft and squeezable nature of a fluffy amigurumi turtle can serve as a gentle stress reliever or a desk companion to bring a moment of peace during a busy day.
- Collectibles: For those who appreciate the art of amigurumi, these turtles can become part of a cherished collection of handcrafted animals, each with its unique character.
These are just a few of the many uses of a fluffy and soft crochet turtle amigurumi pattern. Whether it’s held in your hands or sitting on a shelf, each crochet turtle brings a bit of joy and comfort into our lives.
Materials Required:
- Crochet Hook: 4.5 mm
- Safety Eyes: To bring your turtle to life
- Stitch Marker: To keep track of the beginning of each round
- Crochet Scissors: For snipping yarn ends
- Fiber Fills: To stuff your turtle and make it cuddly

Basic Crochet Abbreviations:
- ch: Chain
- sc: Single crochet
- dc: Double crochet
- sl st: Slip stitch
- st(s): Stitch(es)
- inc: Increase (two stitches in one stitch)
- dec: Decrease (combine two stitches into one)
Useful Tips And Tricks
Creating a crochet baby turtle using amigurumi techniques can be a delightful project. Here are some useful tips and tricks to help you along the way and make your crafting experience enjoyable and the result even more charming:
- Choose the Right Yarn: Select soft, plush yarn to make your turtle extra cuddly. Yarn in varying shades of green can give the shell a more natural, textured look.
- Tight Stitches: Amigurumi projects look best with tight stitches. This helps maintain the shape of your turtle and ensures the fibre fill doesn't peek through. If you find your stitches are too loose, try using a smaller hook size.
- Insert Safety Eyes Before Stuffing: Place and secure the safety eyes to your turtle’s head before you start stuffing. It’s much easier to adjust their position on an unfilled piece.
- Even Stuffing: Make sure to stuff your turtle evenly. Use a crochet hook or a pencil to push the fiber fill into smaller parts like the legs and neck. This will help maintain the shape and prevent lumps.
- Personalize Your Turtle: Add uniqueness to your turtle by experimenting with different colors for the shell or by attaching small accessories like a crocheted bow or hat.
- Use a Stitch Marker: Since amigurumi is often worked in a spiral, using a stitch marker can help you keep track of the beginning and end of each round.
- Washable Materials: Especially if the turtle will be used as a toy, make sure your materials (yarn and fiber fill) are washable. This keeps the amigurumi clean and safe for everyone to enjoy.
- Practice Makes Perfect: If it’s your first time making an amigurumi, don’t be discouraged if your first attempt isn’t perfect. Each project will help you improve.
- Be Patient and Enjoy the Process: Take your time with each stitch and enjoy the creative process. The beauty of amigurumi is that each piece becomes a unique work of art.
Remember, these tips are guidelines to assist you, but feel free to make adjustments based on what works best for you. Crocheting is a creative process, and sometimes the best tricks are the ones you discover yourself.

Leave a Reply