
Crafting a cuddly Dragon from yarn is a delightful journey, guided by Robin from Rose and Lily. Whether using chunky or plush yarn, these dinosaurs come to life with unique charms. With basic crochet techniques like single crochet and magic ring, you'll watch as a sweet dinosaur's head forms, and then seamlessly transitions to a snug body. The addition of safety eyes and a bit of stuffing adds character, making each dinosaur perfect for playtime or decoration. Through simple stitches, these dinosaurs morph into cherished companions, ready to embark on imaginary adventures or brighten up a room.
Crochet Dragon Amigurumi Patterns
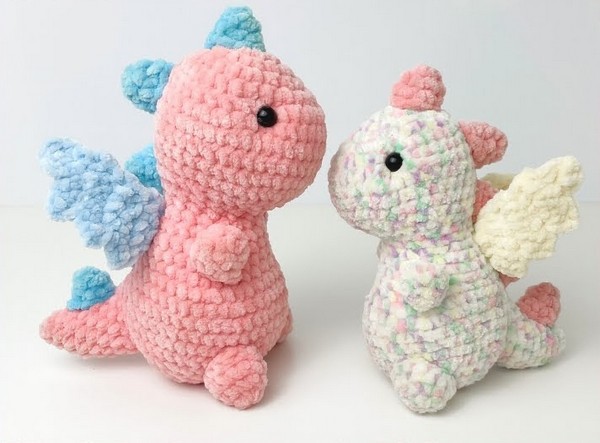
Crochet Dragon Amigurumi Pattern
Materials Needed:
- Super chunky plush yarn in two colours (e.g., James C. Brett Flutterby Chunky or Himalaya Dolphin Baby)
- 9mm safety eyes
- US G crochet hook
- Yarn needle
- Scissors
- Polyfill
- Stitch markers
Stitches to Know:
- Single crochet
- Magic ring
- Slip stitch
- Increase
- Invisible decrease
Step by step Pattern
Head and Body (worked as one piece):
- Round 1: 6 single crochet in a magic ring. Place a stitch marker to mark the end of the round.
- Round 2: Increase (2 single crochet in each stitch) around. (12 stitches)
- Round 3: 1 single crochet, increase repeat around. (18 stitches)
- Round 4: 2 single crochet, increase repeat around. (24 stitches)
- Round 5: 4 single crochet, increase, 4 single crochet, 6 increases in a row followed by 4 single crochet, then an increase, and end the round with 4 single crochet. (32 stitches)
- Round 6: Start with 10 single crochet, then 1 single crochet, increase six times, ending with 10 single crochet. (38 stitches)
- Round 7: 6 single crochet, 2 increases in a row, 22 single crochet, 2 increases in a row, finish with 6 single crochet. (42 stitches)
- Round 8: 42 single crochet around.
- Round 9: 6 single crochet, 2 invisible decreases, 22 single crochet, 2 invisible decreases, 6 single crochet. (38 stitches)
- Round 10: 38 single crochet around.
- Round 11: 10 single crochet, then single crochet, decrease six times, ending with 10 single crochet. (32 stitches)
- Round 12: 5 single crochet, a decrease, 3 single crochet, 6 decreases in a row, 3 single crochet, a decrease, ending with 5 single crochet. (24 stitches)
- Round 13: Decrease, 2 single crochet, decrease, repeat twice, followed by 3 decreases in a row, then again 2 single crochet, decrease, repeated twice. (16 stitches)
- Round 14: 16 single crochet around.
Inserting Eyes and Stuffing the Head:
- Partially stuff the head, insert safety eyes between rounds 6 and 7, approximately 12 or 13 stitches apart.
Continuing with Body:
- Round 15: 3 single crochet, increase repeat four times. (20 stitches)
- Round 16: 4 single crochet, increase repeat four times. (24 stitches)
- Round 17-18: Follow instructions for creating increases and achieving stitch counts as indicated for each round, finishing round 18 with 28 stitches.
- Round 20: 9 single crochet, an increase, 8 single crochet, an increase, then finish with 9 single crochet. (30 stitches)
- Round 21: 9 single crochet, then single crochet, increase six times, ending with 9 single crochet. (36 stitches)
- Round 22: 9 single crochet, then 2 single crochet, increase six times, ending with 9 single crochet. (42 stitches)
- Rounds 23-25: 42 single crochet around for three rounds.
- Round 26: 5 single crochet, decrease repeat six times. (36 stitches)
- Round 27: 4 single crochet, decrease repeat six times. (30 stitches)
- Round 28: 3 single crochet, decrease repeat six times. (24 stitches)
- Round 29: 2 single crochet, decrease repeat six times. (18 stitches)
Stuffing the Body and Neck:
- Stuff the body and neck before closing.
- Round 30: Single crochet, decrease repeat six times. (12 stitches)
- Round 31: 6 decreases. (6 stitches)
Finish:
- Cut the yarn, leaving a tail. Sew the hole closed by weaving through the front loops of the last 6 stitches and pull tight. Secure the yarn tail by weaving it through a few stitches inside the piece.
This completes the main body of the dragon (dinosaur). The video seems to be cut into multiple parts, and this description covers the first part. For further details, like the creation of limbs, tail, and additional features, you would need to refer to the subsequent video parts as mentioned in this excerpt.


Leave a Reply