
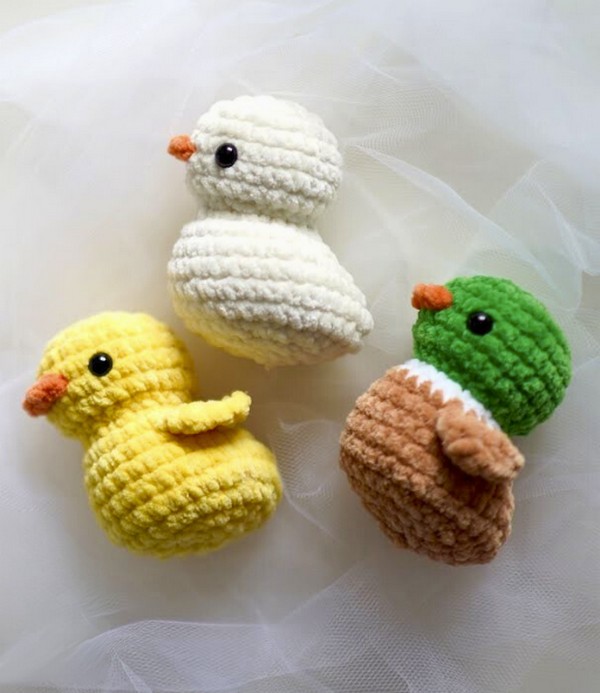
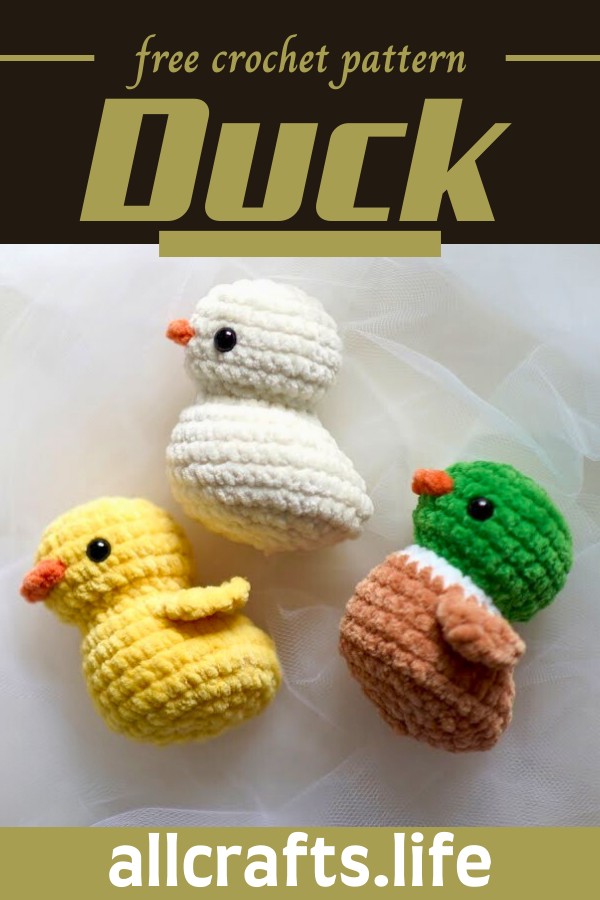
Kids adore cute ducks, and what's more delightful than creating little charming versions of them with this amigurumi pattern? This crochet duck pattern is special because it's crafted in one piece with no sewing required, making it a straightforward and enjoyable project. Whether you want to add wings or experiment with different yarn colours and sizes, this pattern offers flexibility and creativity. Perfect as a keychain, ornament, or a cuddly gift, these little ducks are sure to bring smiles and warmth to hearts. Easy to follow, it promises a satisfying crafting experience for crocheters of all levels.
Making The Crochet Duck
Materials Needed:
- Yarn (Super Bulky Weight #6 yarn for Velvet Duck, Fingering Weight Yarn for smaller duck)
- 5mm Crochet Hook
- Scissors
- Fiberfill stuffing
- Plastic safety eyes (9mm for Velvet Duck, 6mm for smaller duck)
- Stitch marker
Step by step Pattern
Head and Body:
- Round 1: Start with a slip knot, chain 2. In the second chain from the hook (the very first chain made), insert 8 single crochets.
- Round 2: Increase by inserting two single crochets into each of the 8 stitches from the previous round.
- Round 3: Single crochet in the first stitch, then increase in the next stitch. Repeat - around. You should have a total of 24 stitches at the end.
- Rounds 4-7: Single crochet in each stitch around without increasing.
- Round 8: Work a decrease (use invisible decrease if preferred) around, reducing the stitch count to 12.
- Round 9: Increase all around from 12 stitches to 24.
- Round 10: Single crochet 22, then increase in the last 2 stitches.
- Round 11-14: Follow similar patterns increasing in the last few stitches to create a wider base, single crochet around for one full round.
Beak:
- Find the front of the duck's face, use a yarn scrap to mark the location.
- The beak will be between rounds 5 and 6. Identify four stitches for the beak.
- Attach the beak yarn color (e.g., orange) and chain 1, single crochet into the next 2 stitches, and then slip stitch.
- Turn, skip the first stitch (which was the slip stitch), single crochet, single crochet again, and then slip stitch into the last (chain from beginning).
- Fasten off, leaving a long tail, and weave in the ends.
Eyes:
- Insert the plastic safety eyes two stitches apart on either side of the beak between rounds 5 and 6.
Wings (Optional):
- Place the wings between rounds 10 and 11, using 4 stitches for each wing.
- Attach wing yarn, chain 2, work 4 double crochets across the next stitches.
- Chain 1, turn, skip the first stitch, single crochet in the next 2 stitches, then slip stitch into the last stitch.
- Repeat for the second wing on the other side of the body.
Finishing Details:
- Stuff the head and body with fiberfill before closing up the last few rounds.
- For rounds 15 and 16, continue decreasing to shape the body, and stuff as needed.
- Fasten off the final round, and weave in the ends securely.
- Add optional wings by repeating the instructions on the opposite side.
Notes:
- Error correction and adjustments are part of the process, and the creator encourages embracing imperfections.
- The creator suggests using a stitch marker to keep track of the rounds.
- The exact placement of the features like eyes and wings can be adjusted to preference.
- Always stuff the amigurumi before completely closing it up.


Leave a Reply