
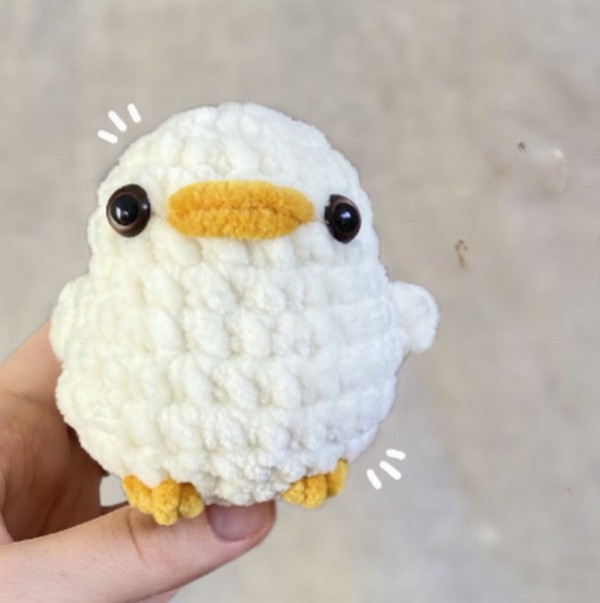
Crochet Mini Duck Amigurumi Pattern
Ducks are wonderful creatures that bring joy to our hearts, whether we see them in a pond or as a cute decorations in our homes. Imagine bringing that sense of warmth and cuteness into your space with a Crochet Mini Duck Amigurumi. This adorable little friend comes to life with a white, fluffy body and a cheerful yellow beak, crafted from the softest yarn to make it extra cuddly. And the best part? You can choose any colour you like to make it uniquely yours. Whether for yourself or as a darling crochet gift, this crochet duck is sure to delight.
Crochet Mini Duck Amigurumi Pattern
Imagine you're crafting your very own adorable little ghosts, straight from the classic arcade world of Pacman! These crochet Pacman Ghosts Amigurumi are not only a playful nod to nostalgic gaming, but they are also cuddly and colorful companions that you can create yourself. With a hook and some yarn, you can bring the whimsy of chasing and being chased in that iconic maze to life in a new, huggable form. Perfect for gifting to a game lover, decorating a retro-themed room, or just for the joy of making, these charming ghosts are a fun project that will have you hooked from the first stitch! 
Crochet Mini Duck Amigurumi are versatile and adorable little creations that can serve multiple purposes:
- Children's Toy: Soft and cuddly, these mini ducks are perfect for little hands, making them a great choice for a child's playtime companion. They are safe and can withstand squeezes and hugs from enthusiastic toddlers.
- Baby Shower Gift: A handmade crochet duck makes a thoughtful and unique gift for baby showers. It's a personal touch that shows care and effort, and can be cherished as a keepsake as the child grows.
- Decorative Accents: These mini ducks can add a touch of whimsy to any room décor. Place them on shelves, desks, or as part of a centerpiece to brighten up the space with their cheerful appearance.
- Educational Tool: Use these amigurumi ducks to engage children in stories or educational themes like learning colors, counting, or even animal types. They are excellent props for interactive learning.
- Stress Relief: For adults, crafting such amigurumi or having them around can offer a delightful way to relieve stress. The process of crocheting is meditative, and the end product brings a smile.
- Party Favors: These little ducks make adorable party favors, whether for a child's birthday, a baby shower, or even a springtime garden party. They're a sweet, personal touch that guests can take home.
Each use makes the Mini Duck Amigurumi a cherished creation, whether you're making it as a gift, for decoration, or just for the joy of crafting.

Leave a Reply