
Crafting Cloe the sea turtle brings the wonders of the ocean into your home with a burst of creativity. This free crochet amigurumi pattern is a joy to make, turning yarn into a soft, adorable turtle that's perfect for cuddles or decorating a room. With its cute snout and shell that can be customized in colours, Cloe is a charming addition to any collection. The pattern, designed with care, is easy enough for beginners and offers a satisfying project for more experienced crafters. The use of Wool-Ease Thick & Quick yarn ensures a warm and durable finish, making Cloe a lasting treasure.
Crochet Turtle Amigurumi Pattern
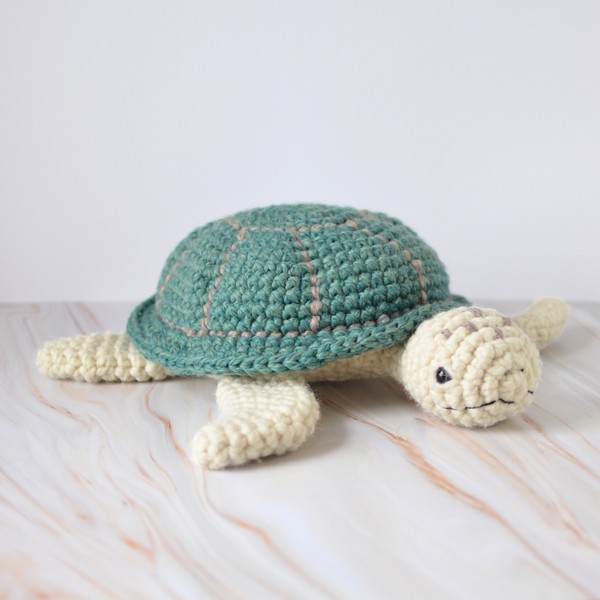
Crochet Turtle Amigurumi
Materials
- Lion Brand® WOOL EASE THICK & QUICK® (Art. #640)
- #099 Fisherman 1 ball (A)
- #563B Hydro 1 ball (B)
- #554C Driftwood 1 ball (C)
- Lion Brand® large-eyed blunt needle
- Crochet hook size 7 mm
- Fiberfill Stuffing
- Black Plastic Safety Eyes (10 mm)
- Black Embroidery Floss
Gauge
- 10 sc + 10 rnds = about 4 in. (10 cm).
Abbreviations
- ch = chain
- ch-sp(s) = chain space(s) previously made
- rem = remain(ing)
- rep = repeat
- rnd(s) = round(s)
- RS = right side
- WS = wrong side
- sc = single crochet
- sl st = slip stitch
- st(s) = stitch(es)

Sea Turtle Pattern Overview
Skill Level: Intermediate due to shaping and assembly.
Pattern Segments:
- Shell: Usually worked from the centre out, the shell might require colour changes to create distinctive patterns. It's often constructed in joined rounds to ensure a smooth, circular shape.
- Underside (Belly): Typically worked in a single, lighter colour in a circular or oval pattern that matches the size of the shell. This piece is often what the stuffing is placed on top of before sealing the turtle.
- Head: Crocheted in rounds, starting with a magic circle and increasing to get the correct size. The head might use a different colour (C) and will have safety eyes attached before filling and closing.
- Limbs (Flippers): Made separately, these are also worked in rounds or rows, and then stitched onto the body. Depending on the design, there may be distinct front and back limbs, often using the same colour as the head.
- Tail: A smaller part usually worked like the limbs and attached to the rear of the belly piece.
Finishing Touches:
- Embroidery details might be added for the mouth and nostrils using black embroidery floss.
- Assembly involves sewing all the pieces together securely and may include layering the shell over the belly and then attaching the head, limbs, and tail accordingly.
- Stuffing is inserted before completely sealing the underside to ensure the turtle has the desired shape and firmness.
Techniques and Tips:
- Stitch marker usage is crucial for keeping track of rounds, especially when working in a spiral.
- Even tension throughout is necessary to ensure all pieces fit together well.
- It might be beneficial to pin the pieces together before sewing to adjust for positioning.

Leave a Reply