
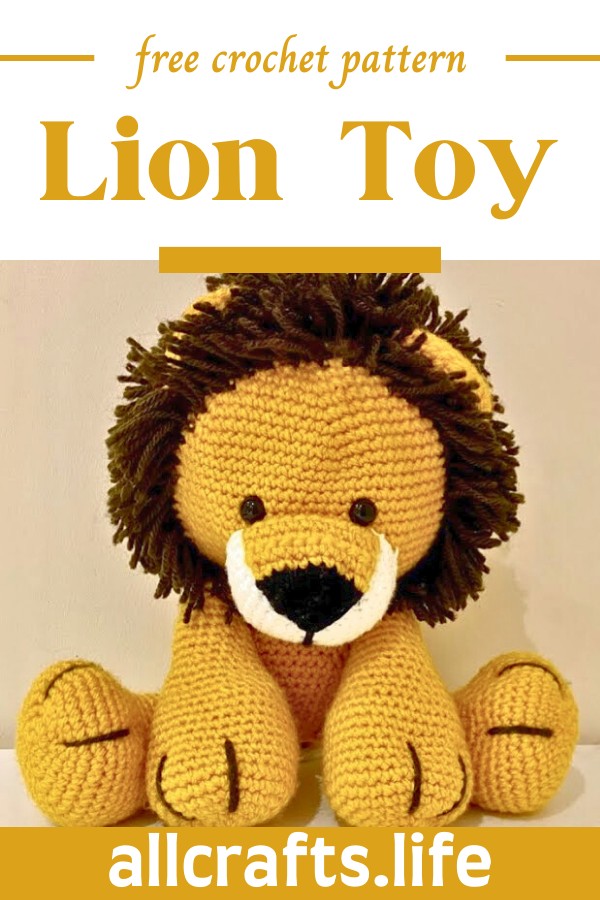
Is your child as brave and adventurous as a lion? Yes, it is! Offer them the most inspiring companion with this crochet Lion or Lioness Amigurumi pattern, a true leader of the jungle. Crafted for both boys and girls, this pattern brings to life a majestic animal with its detailed, fluffy mane and expressive features. Using simple 100% cotton yarn and a 3.5 mm crochet hook, this project transforms yarn into a bold, cuddly friend that's perfect for imaginative play or a comforting snuggle buddy. Its friendly face and huggable body make it a wonderful gift, showcasing your love and craftsmanship in every stitch.
Crochet Lion Or Lioness Amigurumi Pattern

Making The Lion Or Lioness Amigurumi
Materials Needed:
- 100% cotton yarn in mustard colour and some black and white for details.
- 3.5 mm crochet hook
- Fiberfill for stuffing
- Safety eyes
- Stitch marker
- Yarn needle
- Scissors
Step by step Pattern
Head and Body:
Head:
- Start with a magic ring.
- Round 1: Work 6 single crochets (sc) into the magic ring. [6 stitches]
- Round 2: Increase in each stitch around (2 sc in each stitch). [12 stitches]
- Round 3: Sc in the next stitch, increase repeat around. [18 stitches]
- Round 4: Sc in the next 2 stitches, increase repeat around. [24 stitches]
- Round 5: Sc in the next 3 stitches, increase repeat around. [30 stitches]
- Round 6-15: Sc in each stitch around. [30 stitches]
- Insert safety eyes between rounds 14 and 15, spacing them about 9 stitches apart.
- Round 16: Sc in the next 3 stitches, decrease repeat around. [24 stitches]
- Round 17: Sc in the next 2 stitches, decrease repeat around. [18 stitches]
- Round 18: Sc in the next stitch, decrease repeat around. [12 stitches]
- Start stuffing the head.
- Round 19: Decrease around. [6 stitches]
- Fasten off and leave a long tail for sewing.
Body:
- Using mustard yarn, start with a magic ring.
- Round 1: Work 6 sc into the magic ring. [6 stitches]
- Round 2: Increase in each stitch around. [12 stitches]
- Round 3: Sc in the next stitch, increase repeat around. [18 stitches]
- Round 4: Sc in the next 2 stitches, increase repeat around. [24 stitches]
- Round 5-13: Sc in each stitch around. [24 stitches]
- Start stuffing the body.
- Round 14: Sc in the next 2 stitches, decrease repeat around. [18 stitches]
- Round 15: Sc in the next stitch, decrease repeat around. [12 stitches]
- Round 16: Decrease around. [6 stitches]
- Fasten off and leave a long tail for sewing. Attach the head to the body.
Limbs (Make 4, 2 arms and 2 legs):
- Start with a magic ring using mustard yarn.
- Round 1: 6 sc in magic ring. [6 stitches]
- Round 2: Increase around. [12 stitches]
- Round 3-5: Sc around. [12 stitches]
- Stuff lightly.
- Round 6: Sc in the next 1 stitch, decrease repeat around. [8 stitches]
- Fasten off for arms. Continue for legs adding extra 3 rounds of 8 sc each.
- Fasten off, leaving a long tail for sewing to the body.
Ears (Make 2):
- Start with a magic ring.
- Round 1: 6 sc in magic ring. [6 stitches]
- Round 2: Increase around. [12 stitches]
- Round 3: Sc in the next stitch, increase repeat around. [18 stitches]
- Round 4-5: Sc around. [18 stitches]
- Fasten off, leaving a long tail for attaching to the head.
Tail:
- Chain 12, turn.
- Start from second chain from hook, 11 sc back across the chain. [11 stitches]
- Fasten off, leaving a long tail. Attach some yarn at the tip of the tail for the lion's tuft.
Assembly:
- Sew the ears to the top of the head.
- Attach the limbs symmetrically to the body.
- Sew the tail to the rear of the body.
- Use black yarn to embroider the nose and mouth on the face. Use white yarn to add details to the eyes if desired.
This completes the detailed crochet pattern for the lion amigurumi as explained in your provided video link. Make sure to follow each step carefully for the best results. Enjoy your crafting!

Leave a Reply