
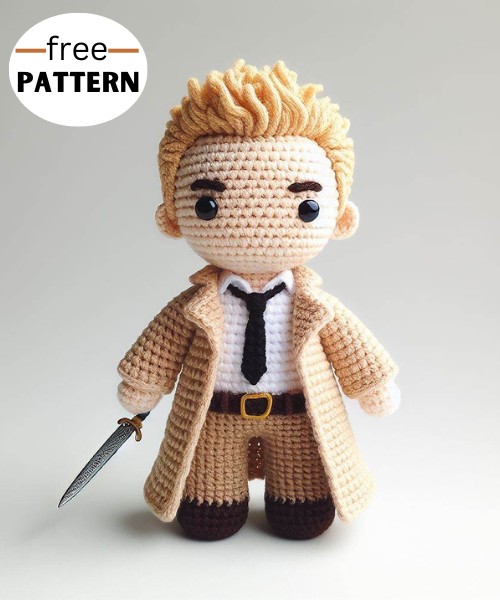
Make a unique amigurumi piece with this Crochet John Constantine Pattern. It is designed with detail to reflect the character's look and charm and is suitable for experienced crocheters.
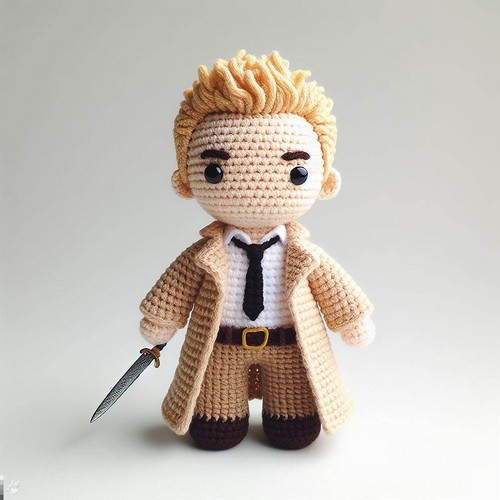
The Crochet John Constantine Amigurumi Pattern is an intricate, handmade piece embodying the likeness of the iconic character, John Constantine, in an adorable doll-like form. The pattern is delineated step-by-step, ensuring a delightful creation process for novice and experienced crocheters. The result captures Constantine's signature look, complete with his trench coat, shirt and tie ensemble, all in plush crochet form.
Step-by-step Guide
Materials:
- Worsted weight yarn in the following colors: flesh, dark brown, tan, black, and red
- Size G/4.00mm crochet hook
- Safety eyes (black, around 9mm)
- Poly-fil stuffing
- Yarn needle
- Scissors

Abbreviations:
- ch: chain
- sc: single crochet
- sl st: slip stitch
- inc: increase (2 sc in one stitch)
- dec: decrease (sc 2 together)
- dc: double crochet
- BLO: back loop only
- FLO: front loop only
- st(s): stitch(es)
- rnd(s): round(s)
Head & Body
Head:
With flesh color yarn, create a magic ring.
- Rnd 1: 6 sc in the magic ring (6 sts)
- Rnd 2: 2 sc in each st around (12 sts)
- Rnd 3: [1 sc, inc] x 6 (18 sts)
- Rnd 4: [2 sc, inc] x 6 (24 sts)
- Rnds 5-9: sc in each st around (24 sts, 5 rounds)
- Attach safety eyes between Rnds 7 and 8, leaving 6 sts between them.
- Rnd 10: [2 sc, dec] x 6 (18 sts)
- Start stuffing the head with poly-fil, and continue to stuff as you work.
- Rnd 11: [1 sc, dec] x 6 (12 sts)
- Rnd 12: dec x 6 (6 sts)
- Cut and fasten off, leaving a long tail. Use the yarn needle to weave the tail through the front loops of the remaining 6 sts, then pull to close the hole at the top of the head. Weave in the end.
Body:
With tan yarn, create a magic ring.
- Rnd 1: 6 sc in the magic ring (6 sts)
- Rnd 2: 2 sc in each st around (12 sts)
- Rnd 3: [1 sc, inc] x 6 (18 sts)
- Rnds 4-8: sc in each st around (18 sts, 5 rounds)
- Rnd 9: [1 sc, dec] x 6 (12 sts)
- Stuff the body with poly-fil.
- Rnd 10: dec x 6 (6 sts)
- Cut and fasten off, leaving a long tail for sewing. Sew the body to the bottom of the head, ensuring the front of the body aligns with the face.
Arms (Make 2)
With flesh color yarn, create a magic ring.
- Rnd 1: 6 sc in the magic ring (6 sts)
- Rnds 2-3: sc in each st around (6 sts, 2 rounds)
- Change to tan yarn.
- Rnds 4-8: sc in each st around (6 sts, 5 rounds)
Do not stuff the arms. Flatten the last round, then sc through both layers to close the opening (3 sts). Cut and fasten off, leaving a long tail for sewing. Sew the arms onto either side of the body.
Legs (Make 2)
With black yarn, create a magic ring.
- Rnd 1: 6 sc in the magic ring (6 sts)
- Rnd 2: 2 sc in each st around (12 sts)
- Rnd 3: BLO, sc in each st around (12 sts)
- Rnds 4-5: sc in each st around (12 sts, 2 rounds)
- Start stuffing the legs with poly-fil, and continue to stuff as you work.
- Rnd 6: [1 sc, dec] x 4 (8 sts)
- Rnds 7-10: sc in each st around (8 sts, 4 rounds)
Cut and fasten off, leaving a long tail for sewing. Sew the legs onto the bottom of the body, leaving a gap between them.
Trench Coat
With tan yarn, ch 32 and join with a sl st to form a circle.
- Rnd 1: Ch 2, dc in each st around, sl st to top of beginning ch-2 (32 sts)
- Rnd 2: Ch 2, dc in each st around, turn (32 sts)
- Rnd 3: Ch 2, dc in next 6 sts, ch 3, skip 5 sts, dc in next 10 sts, ch 3, skip 5 sts, dc in next 6 sts, turn (24 sts, 6 ch)
- Rnd 4: Ch 2, dc in each st and ch around, turn (30 sts)
- Rnds 5-12: Ch 2, dc in each st around, turn (30 sts, 8 rounds)
- Rnd 13: Ch 1, sc in each st around, fasten off (30 sts)
Attach tan yarn around the opening of the right armhole.
- Rnd 1: Ch 1, sc in each st and ch around, sl st to first sc (10 sts)
- Rnds 2-8: Ch 1, sc in each st around, sl st to first sc (10 sts, 7 rounds)
- Cut and fasten off, weave in ends.
Repeat the same on the left armhole.
Hair
- Cut several 6-inch strands of dark brown yarn. Using a yarn needle, loop each strand into the stitches at the top of the head to form hair. Trim the hair to the desired length.
Tie
With red yarn, ch 41.
- Row 1: sc in the second ch from hook and in each ch across, fasten off (40 sts)
Sew the tie around the neck of the Amigurumi, making sure the front end is slightly longer.
Your John Constantine amigurumi is now complete! Feel free to add any additional details or accessories as desired, such as stitching facial features or adding a cigarette.


Leave a Reply