
This pattern guide helps create a delightful Crochet Flounder Amigurumi. Perfect for making an adorable, cuddly sea creature for beginners and advanced crochet enthusiasts.
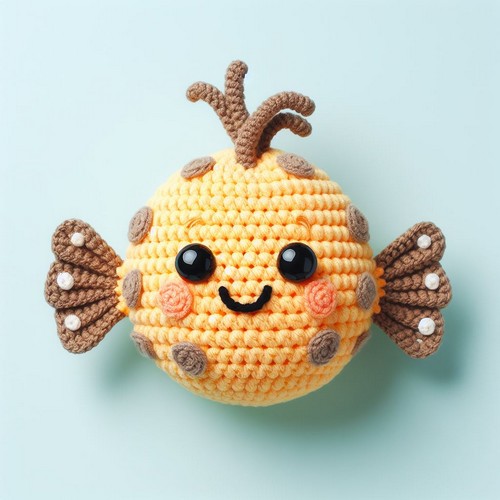
The Crochet Flounder Amigurumi Pattern is a beautiful way to create a cute, soft toy. The pattern is designed for intermediate crocheters and comes with step-by-step instructions that are easy to follow. You can use ethereal wool to replicate Flounder's distinctive, flat, oval shape and make it brim with vivid colors. The pattern will guide you through creating this charming character from yarn, complete with his characteristic grin and large, expressive eyes.
Step By Step Guide
Materials:
- Yarn:
- Light blue (main color)
- Dark blue (stripes and details)
- Orange (mouth)
- Black (eyes)
- White (eyes and teeth)
- 2.75mm crochet hook
- Polyester stuffing
- 9mm safety eyes
- Tapestry needle
Body:
- Light blue yarn: Make a magic ring and ch 6 sc into the ring.
- Light blue yarn: Inc in each st around (12 sc).
- Light blue yarn: Continue crocheting rounds of sc, inc in every other st until there are 36 sts.
- Light blue yarn: Crochet 7 rounds of sc without increasing.
- Stuff the body firmly with stuffing.
- Light blue yarn: Crochet 5 more rounds of sc without increasing.
- Close the hole in the body by pulling the working yarn tight and weaving in the ends.
Tail:
- Light blue yarn: Attach to the bottom of the body and ch 15 sc.
- Light blue yarn: Turn your work and sc in each st back down the ch.
- Light blue yarn: Sc in the next 3 sts of the starting round, then Dec.
- Light blue yarn: Rep the last 2 sts 5 more times to finish shaping the tail.
- Weave in the ends.
Dorsal Fin:
- Light blue yarn: Make a magic ring and ch 8 sc into the ring.
- Light blue yarn: Turn your work and sc in each st back down the ch.
- Light blue yarn: Sc in the next 3 sts of the starting round, then Dec.
- Light blue yarn: Rep the last 2 sts 3 more times to finish shaping the fin.
- Weave in the ends.
- Repeat steps 1-5 to make the second dorsal fin.
Pectoral Fins (make 2):
- Light blue yarn: Make a magic ring and ch 6 sc into the ring.
- Light blue yarn: Turn your work and sc in each st back down the ch.
- Light blue yarn: Sc in the next 3 sts of the starting round, then Dec.
- Light blue yarn: Rep the last 2 sts 2 more times to finish shaping the fin.
- Weave in the ends.
- Repeat steps 1-5 to make the second pectoral fin.
Stripes:
- Dark blue yarn: Starting at the tail, sc in BLO (back loops only) around the body, working up one side and down the other. Change to light blue yarn at the end of each round to create stripes.
- Continue crocheting rounds of sc in BLO, alternating dark and light blue yarn to create stripes.
- Stop when you reach the top of the body near the head.
Eyes:
- Black yarn: Make a magic ring and ch 6 sc into the ring.
- Black yarn: Inc in each st around (12 sc).
- Black yarn: Crochet 1 round of sc without increasing.
- White yarn: Crochet 1 round of sc without increasing.
- Close the hole in the eye by pulling the working yarn tight and weaving in the ends.
- Repeat steps 1-5 to make the second eye.
Mouth:
- Orange yarn: Embroider is a small crescent moon shape for the mouth.
- White yarn: Embroider small dots for the teeth inside the mouth.
Assembly:
- Sew the dorsal fins to the top of the body.
- Sew the pectoral fins to the sides of the body.
- Sew on the safety eyes above the mouth.
Optional details:
- You can add a small blush to the cheeks with pink embroidery floss.
- You can add eyebrows with black embroidery floss.


Leave a Reply