
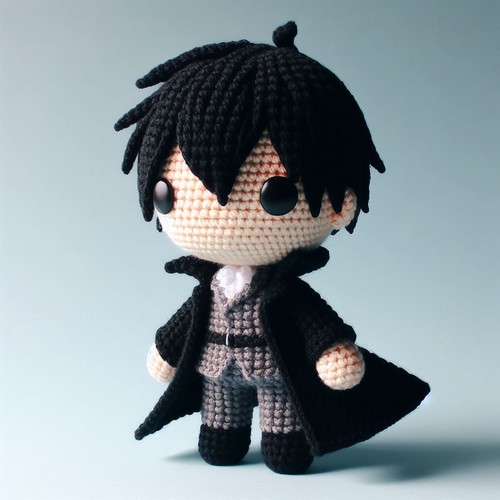
Create your own Doctor Fate, a powerful superhero from DC Comics, with this easy-to-follow crochet amigurumi pattern. Ideal for intermediate skill levels, you'll have a fun crochet piece.

Make the Crochet Doctor Fate Amigurumi Pattern come to life using simple crochet techniques. Comprised of three main sections - helmet, cloak, and body, each piece is created separately and then sewn together. When finished, this pattern stands at approx. 8’’, featuring detailed helmet ridges and cloak folds, bringing the mystical comic book character to life in cozy 3D form.
Step-by-step Guide
Required Materials:
- Yarn of chosen colors
- Crochet hook (appropriate size for your yarn)
- Stitch markers
- Yarn needle
- Fiberfill stuffing
- Optional: Felt for accessories/embellishments
Stitches You'll Need To Know:
- Chain Stitch (Ch)
- Single Crochet (Sc)
- Slip Stitch (Sl st)
- Increase (Inc)
- Decrease (Dec)
Note: This pattern begins with Doctor Fate's helmet, then the body, arms, and lastly, his cape.
Procedure:
Helmet
- Round 1: Start with a magic ring, Chain 1 (Ch 1), then do 6 single crochet stitches (Sc) into the magic ring. (You may place a stitch marker to remind yourself where the round ends and begins.)
- Round 2: Increase (Inc) in each stitch around (12 stitches total).
- Continue this pattern - increasing an equal number of times each round - until you reach a size you like for the head.
Continue until you're satisfied with the helmet's base, then move on to creating the iconic "wings" on Doctor Fate's helmet.
Body
- The body generally starts at the neckline, widens for the shoulders and chest, and then tapers down for the waist and hips.
- Vary your increases and decreases to create a realistic shape.
Arms (make 2)
- Start with a magic ring and 6 Sc, as in the helmet.
- Continue to add rounds without increasing to create a long tubular shape, stuffing as you go.
Cape
- Depending on how detailed you'd like the cape to be, this could be a triangular shape or something more complex.
- To create a basic cape, chain a length that is just over twice the height of the doll.
- Turn and single crochet in each stitch across. Add each additional row with a decrease at the start and end to create a triangular shape.
Assembly
- Using a yarn needle, stitch the arms onto the body where the shoulders would naturally be.
- Stitch on the head next, ensuring that it is securely fastened.
- Attach the cape at the shoulders.
Your Doctor Fate Amigurumi is now complete!


Leave a Reply