
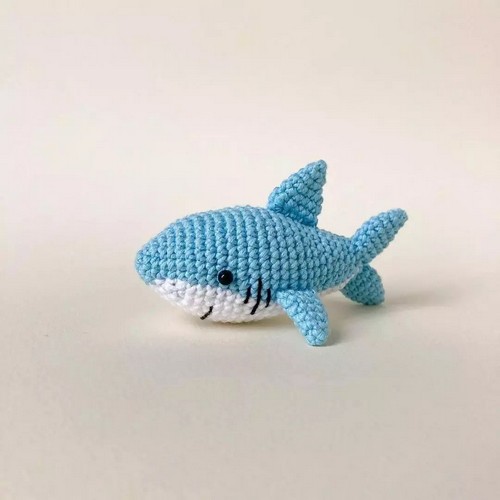
What will be the better gift for little ones than this crochet baby shark amigurumi that is little, smiling, and oh-so-cute? The designer focused on crocheting the shape of a realistic shark but still suitable for children. You can crochet it using basic amigurumi skills, pack it into the box and surprise your dear one. You will be provided with the step-by-step pattern in this post.
Supplies Needed
Following crochet materials and tools are needed for crocheting this tiny shark amigurumi:
- Yarn (light blue and white, The designer used 100% cotton, 90 m/25 g).
- Crochet hook (The designer used a 1. 5 mm hook).
- Plastic eyes size 4 mm, glue.
- Sewing needles and scissors.
- Polyester Fiberfill (Stuffing).
Finished Size:
Size of the shark is about 8 cm.
Crochet Mini Shark Pattern
Are you ready to learn how to crochet baby shark amigurumi? Check out the easy-to-follow pattern:
Abbreviations
While crocheting this shark amigurumi, you will tackle the following abbreviations used in a particular way in the instructions. Make sure you know their meanings (for beginners' help, the designer put them on the list of all short terms and what they stand for. Check out them)
- MR - magic (amigurumi) ring
- ch - chain
- SC - single crochet
- hdc - half double crochet
- inc - increase
- dec - decrease
- slst - slip stitch
Step-by-Step Instructions
Body
Start with blue.
- 1 - 6 sc in MR
- 2-(1 sc, inc)*3 (9)
- 3-(2 sc, inc)*3 (12)
- Now add white yarn (w), do not cut the blue yarn (b)
- 4-w-3 sc, - inc, 3 sc, inc, 3 sc, b w - 1 sc into the same st. (15)
- 5 – w – 4 sc, b – inc, 4 sc, inc, 4 sc, w – inc (18)
- 6 – w – 5 sc, b – inc, 5 sc, inc, 4 sc, w – 1 sc, inc (21)
- 7 – w – 6 sc, b – inc, 6 sc, inc, 4 sc, w – 2 sc, inc (24)
- 8 – w – 7 sc, b – inc, 7 sc, inc, 4 sc, w – 3 sc, inc (27)
- 9 – w – 7 sc, b – 15 sc, w – 5 sc (27)
- 10 – w – 8 sc, b – inc, 8 sc, inc, 4 sc, w – 4 sc, inc (30)
- 11 – w – 8 sc, b – 16 sc, w – 6 sc (30)
- 12 – w – 9 sc, b – inc, 9 sc, inc, 4 sc, w – 5 sc, inc (33)
- 13 – w – 9 sc, b – 17 sc, w – 7 sc (33)
- 14 – w – 9 sc, b – 17 sc, w – 7 sc (33)
- 15 – w – 5 sc, dec, 2 sc, b – 9 sc, dec, 6 sc, w – 3 sc, dec, 2 sc (30)
- 16 – w – 8 sc, b – 16 sc, w – 6 sc (30)
- 17 – w – 4 sc, dec, 2 sc, b – 8 sc, dec, 6 sc, w – 2 sc, dec, 2 sc (27)
- 18 – w – 7 sc, b – 15 sc, w – 5 sc (27)
- 19 – w – 3 sc, dec, 2 sc, b – 7 sc, dec, 6 sc, w – 2 sc, dec, 1 sc (24)
- 20 – w – 6 sc, b – 14 sc, w – 4 sc (24)
- Start stuffing.
- 21 – w – 2 sc, dec, 2 sc, b – 6 sc, dec, 6 sc, w – 1 sc, dec, 1 sc (21)
- 22 – w – 5 sc, b – 13 sc, w – 3 sc (21)
- 23 – w – 1 sc, dec, 2 sc, b – 5 sc, dec, 6 sc, w – dec, 1 sc (18)
- 24 – w – 4 sc, b – 12 sc, w – 2 sc (18)
- 25 – w – dec, 2 sc, b – (3 sc, dec)*2, 2 sc, w – 2 sc (15)
- 26 – w – 3 sc, b – 10 sc, w – 2 sc (15)
- 27 – w – dec, 1 sc, b – 2 sc, dec, 3 sc, dec, 1 sc, w – 2 sc (12)
- 28 – w – dec, b – (2 sc, dec)*2, w – 2 sc (9)
Tail fins (make 2)
Blue yarn.
- 1 - 4 sc in MR
- 2-(1 sc, inc)*2 (6)
- 3-(1 sc, inc)*3 (9)
- 4-(1 sc, inc)*2, 5 sc (11)
- 5-11 Sc
- 6-6 sc, dec, 3 sc (10)
- 7-5 sc (uncomplete round)
- Do not stuff. Leave a thread for sewing.
Upper fin
Blue yarn.
- 1 - 4 sc in MR
- 2-(1 sc, inc)*2 (6)
- 3-(1 sc, inc)*3 (9)
- 4-(2 sc, inc)*3 (12) 5-12 sc
- 6 - 4 sc, 4 hdc, 4 sc (12)
- Do not stuff. Leave a thread for sewing.
- 21 - w - 4 sc, dec, 4 sc, b - 4 sc, dec, 3 sc, dec, 3 sc (21)
- 22-w-9 sc, b - 12 sc (21)
- 23-w-3 sc, dec, 4 sc, b - 3 sc, dec, 3 sc, dec, 2 sc (18) 24 w 8 sc, b - 10 sc (18)
- 25-w-3 sc, dec, 3 sc, b - 2 sc, dec, 2 sc, dec, 2 sc (15)
- 26-w-7 sc, b - 8 sc (15)
- 27-w-3 sc, dec, 2 sc, b - 1 sc, dec, 2 sc, dec, 1 sc (12)
- 28-w-2 sc, dec, 2 sc, b - dec, 2sc, dec (9)
- Stuff to the end.
- Cut the white yarn, secure it and weave in the ends. Cut the blue yarn and sew the opening with it, secure the thread, weave in the ends.
Side fins (make 2)
Blue yarn.
- 1 - 4 sc in MR
- 2- (1 sc, inc)*2 (6)
- 3-(1 sc, inc)*3 (9)
- 4-8 sc, inc (10)
- 5-6-10 sc (2 rounds)
- Do not stuff. Leave a thread for sewing. Fold the edges together
and sew them.
Assembly
- 1) sew tail fins on the back.
- 2) sew on the side fins on rounds 16-19 around the color change line.
- 3) sew on the upper fin on rounds 16-21.
- 4) glue the eyes between the 10th and 11th rounds on the sides, and position them so that they are symmetrical according to the fins and the white part of the body.
- 5) embroider a smile on the 10th round.
- 6) embroider 3 stripes on each side in front of the side fins.
Designer: Scandistyle_dolls On Instagram

Leave a Reply