
Seals are delightful creatures of the ocean, known for their playful nature and endearing appearance. With their round, charming eyes and graceful swimming, these adorable animals have captured the hearts of many. They are social beings, often found resting on shores or gliding through chilly waters. Creating a crochet version of a baby seal can bring a touch of this marine wonder into your home, offering a sweet and cuddly representation of the lovable seal. Whether for you or as a gift to someone special, the Crochet Baby Seal Amigurumi Pattern is designed to delight and inspire the joy these ocean dwellers give to all who adore them.
Crochet Baby Seal Amigurumi Pattern
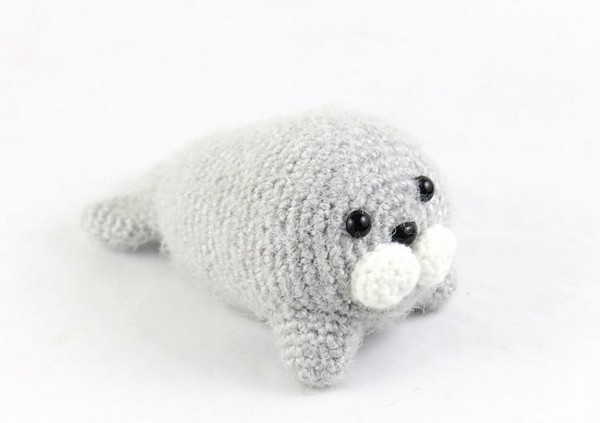
Craft a charming baby seal with this delightful crochet pattern that allows for customization in any colour you fancy. The pattern is straightforward, making it ideal for those new to amigurumi, the Japanese art of knitting or crocheting small stuffed animals. Not only is the finished seal adorable with its plump body and sweet face, but it also makes for a cozy companion or a thoughtful handmade gift. Equipped with easy-to-follow steps for each body part, including arms, tail, and cheek enhancements, you're sure to enjoy each stitch from start to finish.
Crochet Baby Seal Amigurumi Pattern
Supplies Needed:
- Crochet Hook: 4mm (Gauge is not critical for this project but may affect size and amount of yarn used)
- Yarn: 4/Medium weight in any desired colors for the main body, and white for the cheeks. (The example uses grey as the "Main Color".)
- Safety Eyes: 12mm
- Safety Nose
- Tapestry Needle (for seaming and weaving in ends)
- Scissors
- Stuffing (for filling your amigurumi)
Difficulty Level:
- Easy
Pattern Key Information:
- The term “Main Color” (MC) refers to the primary color of your amigurumi seal.
- The pattern instructs to start with the head, which seamlessly transitions into the body as one piece.
- Following the body, separate pieces for the cheeks, tail, and arms are made and then attached.

Abbreviations:
- Sc - Single crochet
- Inc - Increase (2 sc in one stitch)
- Dec - Decrease (sc 2 together)
- St(s) - Stitch(es)
- R - Round
General Notes:
- It's mentioned to use safety eyes and a safety nose. Placement of the safety eyes is indicated in the pattern at specific rounds, utilizing stitch markers for precise positioning.
- Stuffing is to be added during the creation of the body, with additional stuffing added just before finishing off.
Key Parts of the Pattern:
- Body and Head (beginning with a magic ring and working in rounds, increasing, then straight for several rounds before decreasing to shape)
- Cheeks: Made separately in white and sewn onto the face below the eyes.
- Tail: Made in two parts, shaped through increases and then worked straight before decreasing.
- Arms: Started with a magic ring, increased, and then worked straight before finally increasing again for shaping.
Given these details, you're all set to start creating your baby seal amigurumi. Enjoy your crocheting!

Leave a Reply