
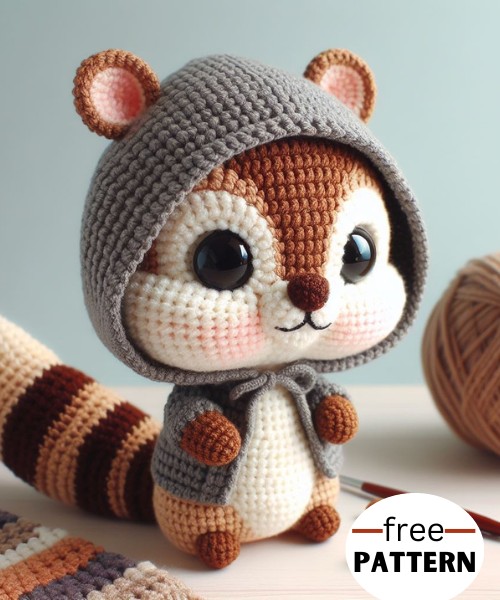
This crochet pattern guides you in making an adorable amigurumi chipmunk donning a cute hoodie. Perfect for intermediate-level crafters who adore creating unique crochet toys.

Introducing the adorable Amigurumi Chipmunk in Hoodie Crochet Pattern! Crocheted with love, this charming chipmunk toy stands out with its distinct, plump shape and stylish hoodie. With easy-to-follow instructions, you'll enjoy crocheting this characterful critter from high-quality yarn. The finished chipmunk amigurumi makes a perfect gift or a delightful addition to your collection!
Step-by-step Guide
Materials:
- Yarn in dark brown, light brown, beige, pink, black, and white
- 2.5mm crochet hook
- 9mm safety eyes
- Fiberfill
- Tapestry needle
- Stitch markers (optional)

Instructions:
Head and Body:
- Using the dark brown yarn, make a magic ring and work 6 single crochets into the ring.
- Pull the magic ring closed and tighten it to secure it.
- Crochet 12 rounds of single crochets, increasing each stitch around in the first round.
- Start stuffing the head and body lightly with fiberfill.
- Crochet 18 more rounds of single crochets without increasing.
- Switch to light brown yarn and crochet 2 more rounds.
- Finish off and leave a long tail for sewing.
Ears:
- Using the light brown yarn, make a magic ring and work 6 single crochets into the ring.
- Pull the magic ring closed and tighten it to secure it.
- Crochet 7 rounds of single crochets, increasing in each stitch around in the first round.
- Finish off and leave a long tail for sewing.
- Repeat steps 1-4 to make the second ear.
Arms:
- Using the light brown yarn, make a magic ring and work 6 single crochets into the ring.
- Pull the magic ring closed and tighten it to secure it.
- Crochet 10 rounds of single crochets without increasing.
- Finish off and leave a long tail for sewing.
- Repeat steps 1-4 to make the second arm.
Tail:
- Using the dark brown yarn, make a magic ring and work 6 single crochets into the ring.
- Pull the magic ring closed and tighten it to secure it.
- Crochet 9 rounds of single crochets without increasing.
- Finish off and leave a long tail for sewing.
Legs:
- Using the dark brown yarn, make a magic ring and work 6 single crochets into the ring.
- Pull the magic ring closed and tighten it to secure it.
- Crochet 7 rounds of single crochets without increasing.
- Finish off and leave a long tail for sewing.
- Repeat steps 1-4 to make the second leg.
Assembly:
- Sew the ears to the top of the head, tilting them slightly forward.
- Sew the arms to the sides of the body.
- Sew the legs to the bottom of the body.
- Sew the tail to the back of the body.
- Sew on the safety eyes.
- Embroider facial features on the face using black and pink yarn. You can stitch on small black ovals for the eyes and a pink triangle for the nose.
Hoodie:
- Using the beige yarn, crochet a chain of 24 stitches.
- Turn the chain and crochet 24 single crochets into the back loops of the chain stitches.
- Repeat step 2 for 18 more rows.
- Finish off and leave a long tail for sewing.
- Fold the rectangle in half lengthwise and sew the two short ends together to create a tube.
- Turn the tube right side out.
- Fold the top edge of the tube down twice and crochet single crochets around the folded edge to create a brim.
- Sew the hood to the head, positioning it so that the brim covers the top of the head and the ears.
I hope this helps you crochet your adorable Amigurumi Chipmunk in Hoodie!


Leave a Reply