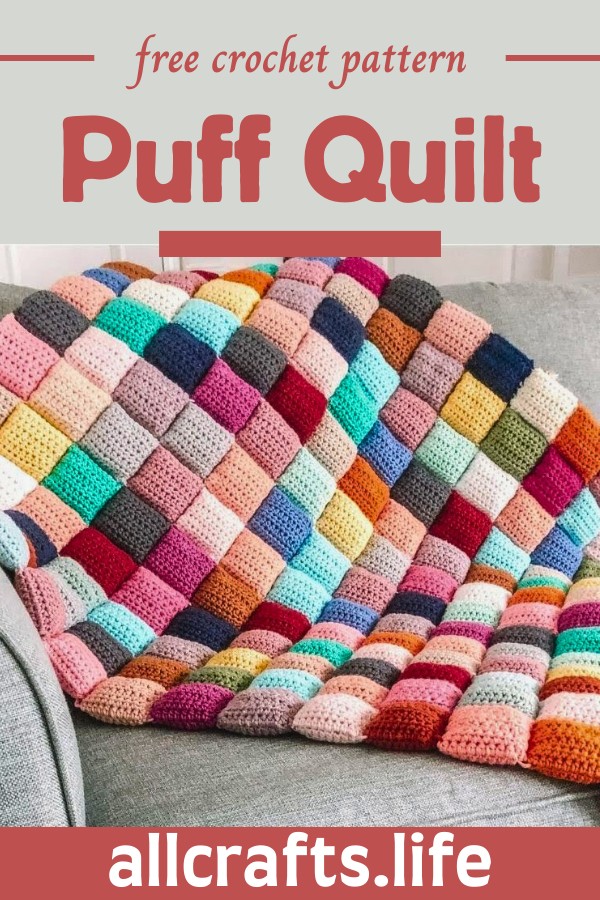
Make this Crochet Puff Quilt Pattern that suits best for any skill level, using scrap yarn that adds charm and promotes sustainability.
Crochet Puff Quilt Pattern
Exploring the Crochet Puff Quilt Pattern offered in the tutorial feels like unlocking a treasure trove for any crochet enthusiast. The step-by-step guidance ensures a smooth crocheting trip, from creating individual squares to assembling them into a cozy quilt. What stands out is the freedom to customize the quilt size, making it a versatile project for any skill level. The incorporation of scrap yarn not only adds to the quilt's charm but also embraces sustainability. This pattern is a delightful blend of simplicity and creativity, perfect for adding a touch of warmth and personality to any home.

Materials Needed:
- Worsted weight yarn (scraps work fine)
- 5.0 millimeter crochet hook
- Yarn needle
- Scissors
- Measuring tape
- Polyfill stuffing
Square Pattern:
- Start: Make a slip knot. Chain 11.
- Row 1: Skip the first chain. Half double crochet (HDC) into the second chain from the hook. Place one HDC in each chain to the end (10 HDC total).
- Turn your work and HDC in the remaining loops of the chain for another 10 HDC. This should give you a strip with 20 HDC.
- Row 2 - 8: Slip stitch to the first stitch, chain one and turn your work. Continue with rounds of 20 HDC around. Count your rows to make sure you have 8, and measure to ensure a square of about 3x3 inches. Adjust hook size if necessary to meet gauge.
- Tail for Assembly: Cut yarn leaving a long enough tail for assembly (about three times the length across the top and down one side of your square).
- Closing the Square: Sew the top together with whip stitch, adding in polyfill stuffing as you go along.

Assembly:
- First Square Row: Assemble individual squares into your first row, keeping in mind that the side with the visible stitching will be the back of the quilt.
- Second Square Row: Repeat the process of creating individual squares and assemble them into a second row.
- Joining Rows: With a length of yarn about three times the length of your quilt row, stitch the rows together using either the whip stitch or mattress stitch. Start from one side of the quilt, ensuring the back faces up.
- Continue Joining: Attach additional rows in the same manner, making sure to securely stitch the corners where four squares meet for durability.
Finishing Touches:
- Ends: Once all rows are assembled and your blanket reaches the desired size, weave in all remaining ends for a clean finish.
Additional Tips:
- It's perfectly fine if your squares are slightly off from the 3x3 inch size, as they will be sewed together. Strive for consistency for a professional-looking final product.
- When stuffing your squares, ensure they are not overfilled; you want them to puff out, not be overstretched.
- Always stitch the squares from the same side when joining them to ensure a flat back and a uniformly puffy front surface.
- Adapting the length of the stitch to secure the squares depends on the size of your blanket and your personal preference to avoid tangled yarn.
- For larger quilts, consider working in sections to make it more manageable.
- Remember to securely stitch the corners where the stress will be the highest when the blanket is handled or moved around.
Finishing Words:
- Caitlin from Sassen Stitch Crochet expresses excitement for the design and invites crocheters to adapt the quilt pattern to any size desired, using the basic 3x3 inch square as the building block for the design.
- Remember to tag Sassen Stitch Crochet on social media to share your quilt creations!
Enjoy your Crochet Puff Quilt Crafting!


Leave a Reply