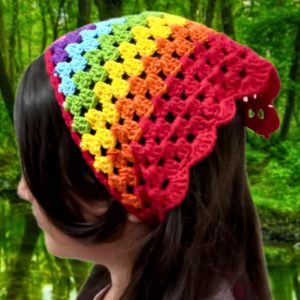
Making something with your own hands is like putting a piece of your heart into a creation. It's a wonderful way to show your style and care. With the No Sew Crochet Granny Square Triangle Bandana, you can create the most stylish and functional accessory for yourself. This guide makes it easy to craft something beautiful without the need for complicated sewing skills. Whether you're accessorizing for a day out or adding a handmade touch to your wardrobe, this bandana is a perfect project. Not only is it a fun and engaging craft, but it also leaves you with a unique item that you can wear with pride, knowing you made it yourself!

Crafting a Crochet Granny Square Triangle Bandana is like weaving a little magic with yarn. Using just 73 grams of cotton yarn and a 4mm hook, this project turns simple stitches into a stylish accessory. The pattern begins with a slip knot, evolves with double crochets, and grows into a delicate triangle, adorned with single crochet straps for a snug fit. Its simplicity is deceptive, revealing a beautiful and functional accessory, perfect for adding a touch of handcrafted charm to any outfit.
Making The Triangle Bandana
Materials Needed:
- 73g of Lion Brand's 24/7 Cotton Yarn in the color Bay Leaf (100% mercerized cotton, medium/number 4 weight)
- 4mm Clover Amour Crochet Hook
- Yarn Needle
Step by step Pattern
- Start with a Slip Knot:
- Place yarn over the palm of your hand, tail end at the bottom.
- Loop around two fingers to form an X.
- Insert hook under one side of the X, over and grab the other side, pull it through.
- Tighten the slip knot.
- Chain Six:
- Yarn over, pull through the loop to make your first chain.
- Repeat until you have six chains.
- First Row:
- Work into the very first chain:
- 3 Double Crochets (DC) into the first chain.
- Chain 2, then 3 more DC into the same chain.
- Chain 1, and add one more DC into the same space.
- This completes the first row, forming a triangle.
- Work into the very first chain:
- Second Row:
- Chain 5 and turn.
- Into the chain-1 space from the last row: 3 DC.
- In the chain-2 space (corner): 3 DC, chain 2, and 3 more DC.
- Chain 1, then in the last space: 3 DC, chain 1, and 1 DC.
- For increasing, repeat this row, adding rows to your counter to keep track.

- Subsequent Rows:
- Every row follows a similar pattern:
- Start each row with chaining 5 (acts as 1 DC + chain 1).
- Work 3 DC clusters with chain 1 between every cluster along the sides.
- Corner spaces always get: 3 DC, chain 2, 3 DC.
- End each row with: 3 DC, chain 1, and 1 DC.
- Every row follows a similar pattern:
- Repeat until Desired Size:
- The sample stopped at 18 rows, measuring about 37cm along the shorter side of the triangle.
- Strap:
- Chain a length equal to the desired strap length on one side; the example used 40.
- Single crochet back along the chains, starting with the second chain from the hook.
- Work 3 single crochets into each space along the long side of the triangle.
- To mirror the strap on the other side, repeat the chain and single crochet steps.
- Connect the end of the strap with a slip stitch to the triangle to avoid sewing.
- Finishing:
- Fasten off, weave in the loose ends with a yarn needle for a neat finish.
Wearing the Bandana:
- Place the triangle over the head with the point down, two straps going around the neck.
- Tie the straps in a bow under the hair at the back of the neck.
- Adjust to flatten against the head and style as desired.
This pattern summary uses the detailed instructions provided from your scrape of the video. It breaks down the project into manageable steps for creating your crochet granny square triangle bandana. Happy crocheting!


Leave a Reply