
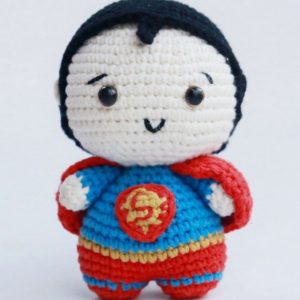
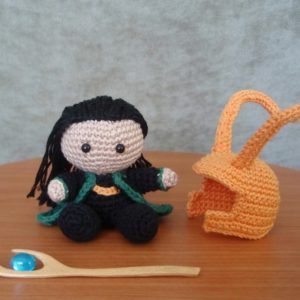
Crochet Vision Amigurumi Patterns have captured the hearts of many, reflecting the love people have for these charming and whimsical creations. Vision, in all its forms, represents not just a character or an object but a piece of art that brings joy and comfort to those who craft and receive them. These crocheted amigurumi wonders offer more than just aesthetic appeal; they serve as heartfelt gifts, playful toys for children, and decorative pieces that add a cozy touch to any room. Whether you're a seasoned crocheter or a newcomer eager to embark on a crafting journey, these amigurumi patterns invite you to transform simple yarn into something truly special.

Making The Crochet Vision
Materials:
- 2.00 mm crochet hook
- YarnArt Jeans (55% cotton, 45% acryl, 50g/160m), colors: yellow, red, blue
- 8 mm black safety eyes
- Toy filler
- Scissors
- Tapestry needle
- Pins
- Stitch marker
Finished size: Approx. 15 cm (5.9 inches) tall with specified materials.
Note: You may use any size yarn and hook appropriate for your yarn choice. Adjust the size of the safety eyes to suit your yarn.
Abbreviations:
- MR – magic ring
- sc – single crochet
- ch – chain stitch
- sl st – slip stitch
- inc – increase
- dec – invisible decrease
- dc – double crochet
- hdc – half double crochet
- (...)х n – repeat instructions within brackets n times
- R – round
Pattern:
Arms (make 2):
Crochet with red yarn.
- 6 sc in MR (6)
- (2 sc, inc)x2 (8)
-
- 8 sc (8)
-
Switch to blue yarn.
6. - 14. 8 sc (8)
Do not stuff the arms.
Press the opening together; align 4 stitches side by side and work 1 sc through both sides. Fasten off, leaving a long yarn tail for sewing.
Leg 1:
Start with red yarn.
- 6 sc in MR (6)
- 6 inc (12)
- (1 sc, inc)x6 (18)
- 18 sc (18)
- 6 sc, 4 dec, 4 sc (14)
- 6 sc, 2 dec, 4 sc (12)
- 12 sc (12)
Switch to blue yarn.
8. - 10. 12 sc (12)
- Only 11 sc (12)
Fasten off. Cut the yarn.
Leg 2 + Body:
Repeat instructions for Leg 1, but do not fasten off after step 11.
12. ch 3, then crochet 12 sc, 3 sc, 12 sc to join the legs (30)
- 9 sc, inc, 14 sc, inc, 5 sc (32)
-
- 32 sc (32)
-
- 9 sc, dec, 14 sc, dec, 5 sc (30)
- 30 sc (30)
- (3 sc, dec)x6 (24)
-
- 24 sc (24)
-
Start stuffing the body.
- (2 sc, dec)x6 (18)
-
- 18 sc (18)
-

Head:
Switch to red yarn.
29. (1 sc, inc)x6 (18)
- 18 inc (36)
- (5 sc, inc)x6 (42)
- (6 sc, inc)x6 (48)
-
- 48 sc (11 rounds) (48)
-
- (6 sc, dec)x6 (42)
- (5 sc, dec)x6 (36)
- (4 sc, dec)x6 (30)
Place the safety eyes between rounds 37 & 38, about 9 stitches apart.
- (3 sc, dec)x6 (24)
Start stuffing the head.
- (2 sc, dec)x6 (18)
- (1 sc, dec)x6 (12)
- 6 dec.
Fasten off. Cut the yarn.
Raincoat:
Using yellow yarn.
- ch 18, start from 2nd chain from the hook, 17 hdc (17)
-
- ch 1, turn, 17 hdc (17)
-
- ch 1, turn, dec, 13 hdc, dec (15)
- ch 1, turn, 15 hdc (15)
- ch 1, turn, dec, 11 hdc, dec (13)
- ch 1, turn, 13 hdc (13)
- ch 1, turn, dec, 9 hdc, dec (11)
- ch 1, turn, dec, 7 hdc, dec (9)
- ch 1, turn, dec, 5 hdc, dec (7)
- ch 1, turn, dec, 3 hdc, dec (5)
- ch 1, turn, dec, 1 hdc, dec (3)
Arms (make 2):
With red yarn.
- 6 sc in MR (6)
Switch to blue yarn after making the arms.
Legs and Body:
Start with one leg, then repeat for the second leg without fastening off after leg 2 to continue to the body.
Leg 1:
With red yarn.
- 6 sc in MR (6)
- 6 inc (12)
- (1 sc, inc)*x6 (18)
Leg 2 + Body:
Repeat the instructions for Leg 1. Do not fasten off after completing Leg 2. Continue to crochet the body by joining the legs and following the body pattern.
Head:
Switch to red yarn after the body.
- 6 sc in MR (6)
- 6 inc (12)
- (1 sc, inc)*x6 (18)
- (2 sc, inc)*x6 (24)
Continue increasing until you reach 48 sc for the head, then crochet several rounds without increases before decreasing to close the head. Place safety eyes between rounds.
Raincoat:
With yellow yarn.
- Chain 18, start from the 2nd chain from the hook, 17 hdc.
Helmet:
With blue yarn.
- 6 sc in MR (6)
- 6 inc (12)
Continue increasing until you reach 48 sc in a round, then work on the flat part of the helmet by turning your work.
Helmet Detail:
Create a detailed part on the side of the helmet with blue yarn.
- Attach blue yarn 6 stitches from the beginning of the side.
Crystal:
With yellow yarn.
- 5 sc in MR, sl st to close.
Assembly and Finishing:
- Sew the arms to the body symmetrically.
- Attach the cape (raincoat) around the neck. Secure it by fastening the chain portion with two stitches of red yarn below the head.
- Sew the helmet to the head.
- Sew the crystal to the detail on the helmet.
Notes:
- Adjustments to the size of the amigurumi can be made by using different yarn weights and hook sizes.
- Remember to stuff the parts firmly as you go to maintain shape.


Leave a Reply